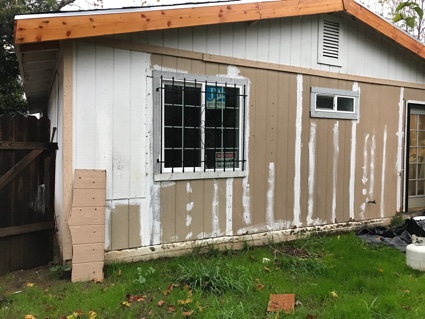
Mold vs. Mildew

Mold and mildew

Mold vs. Mildew: “What’s the Difference?”

Mold and mildew are fungi that develop due to excessive, unchecked moisture. Both mold and mildew start as tiny spores that often require a similar environment to flourish, making them easy to confuse. However, mold and mildew shouldn’t be treated the same. It’s important to understand the differences in appearance and health effects to prevent more significant issues from taking root in your property.

Identifying Mold vs. Mildew

Though the term is often used interchangeably with mold, mildew refers to specific types of fungus, including some types of mold. Both are considered fungi that require water, oxygen, and food to live and survive. They grow in multiple temperatures and environments, with some strains thriving at higher temperatures. According to the EPA, mold can spread on any organic matter, including clothing, leather and paper, as well as ceilings, walls and floors. Mildew often appears on shower walls and windowsills, but can also grow on plants, paper or cloth.

Mold and mildew differ in appearance and possible health risks. Mildew has a gray, white or light brown color and generally rests flat on the surface of a moist area. It has a powdery appearance that may have a distinct, foul odor. Mold has a fuzzy, raised appearance and in unaired areas has a strong, musty smell. It often appears in darker shades of black, green and red. Mold and mildew can appear on damp surfaces as soon as 24 to 48 hours. Mildew typically appears first as small dots and grows in an outward pattern, but it remains on the surface. Mold, however, can quickly grow inward and upwards, eating into walls, ceilings and other surfaces causing substantial property damage.

Health Effects

Although mildew can cause minor respiratory problems like coughing fits, it is not as invasive or troublesome as mold. Mold can produce allergens that can trigger allergic reactions, asthma attacks or produce potent toxins and/or irritants. Hypersensitivity pneumonitis (lung inflammation) has also been linked to mold exposure. People with the greatest risk of health effects from mold exposures are the elderly, the very young and expectant mothers, as well as individuals with mold allergies, asthma and other chronic respiratory ailments.

Mold vs. Mildew

Mold

  • Fuzzy, raised appearance
  • Darker shades of black, green or red
  • Often confused for dirt
  • Produces allergens that can trigger allergic reactions and asthma attacks
  • Produces potent toxins and/or irritants

Mildew

  • White/gray appearance in early stages
  • Turns brown
  • Flat, powdery
  • Small dots
  • Causes minor respiratory issues

Tips to Prevent Mold and Mildew

Controlling moisture levels is the best way to prevent mold and mildew growth. Moisture meters can help detect moisture hotspots in ceilings, floors and walls. Mildew is a surface fungus that can be cleaned with a disinfectant cleaner, bleach and a scrub brush. Mold is often a sign of a larger issue that may require professional treatment. Unlike mildew that grows on the surface, mold penetrates the objects it lives on and eats away at their cellular integrity. It’s best to invest in prevention up front to help control mold and mildew instead of scrambling to remediate them.

The following actions can help prevent mold and mildew growth:

  • Keeping humidity levels low, between 30-50%
  • Using dehumidifiers, fans and opening windows, especially during humid months
  • Fixing leaky roofs, windows and pipes
  • Ventilating bathrooms, laundry rooms, kitchens, basements and other damp areas
  • Drying water-damaged areas within 24 – 48 hours
  • Regularly inspecting building exterior for signs of leaks and other issues like cracked masonry, window frames and deteriorating flashing

Testing for Mold and Mildew

Research by the National Institute of Occupational Safety and Health (NIOSH) suggests that finding and correcting sources of dampness is often more effective at preventing health problems than counting indoor microbes. NIOSH developed a tool to help assess damp building areas and prioritize the remediation of problem areas. However, there are some simple ways to tell if a stain is dirt or a sign of a bigger mold problem:

  • It has a strong, musty smell
  • A drop of bleach lightens its color within 1-2 minutes
  • It’s growing on warping, cracking or peeling material
  • A source of moisture without much light is nearby

Cleaning Mold and Mildew

Before cleaning mold and mildew, always wear respiratory protectionchemically-resistant gloves and eye protection.

Removing Mildew

  1. Don PPE and clean the area with bleach, mild detergent or a household cleaner.
  2. Scrub with a disposable brush, sponge or rag until the mildew is gone.
  3. Dispose of contaminated PPE.

Removing Mold

If you find small concentrations of mold on easy-to-clean surfaces like windows, tubs, tiles and sinks, it can usually be cleaned with disinfectants or a bleach and water solution. Larger areas of mold may require professional remediation.

  1. Protect yourself: don proper PPE.
  2. Remove or dispose of all damp or damaged materials:Start by removing anything that can be easily thrown away, such as wet wallpaper, rotted drywall, wood and fabrics.
  3. Mist with clean water: When cleaning mold and mildew, use a squirt bottle to mist the remaining area with clean water to help prevent the spores from being released into the air.
  4. Clean with soapy water, bleach solution or disinfectants: Mold can be effectively cleaned from hard surfaces using mild detergents, disinfectants or a bleach solution.
  5. Scrub mold away: Use a scrub brushor sponge to clean the mold. Frequently change the water and use fresh sponges. Old water can redeposit mold or mildew spores back in the same area.
  6. Thoroughly dry area: Whether you’re cleaning mold or mildew, it’s crucial to thoroughly dry the area for at least 48 hours. Use fansdehumidifiersand carpet extractorsto help remove moisture. The site must be completely dry before using again. Otherwise, the mold or mildew will continue to spread.

Hiring a Specialist

According to the EPA, if you discover mold growing on drywall, studs, subflooring or your HVAC system in an area greater than 10 square feet, it’s best to hire a professional mold removal service. Improperly treating severe infestations can cause cross-contamination to other sites.

structural truss failure

Load Bearing Wall Removal Issues – Did you DIY?

A common request in a somewhat extensive residential remodel is the desire to remove a wall to create a more open concept in the living area. 
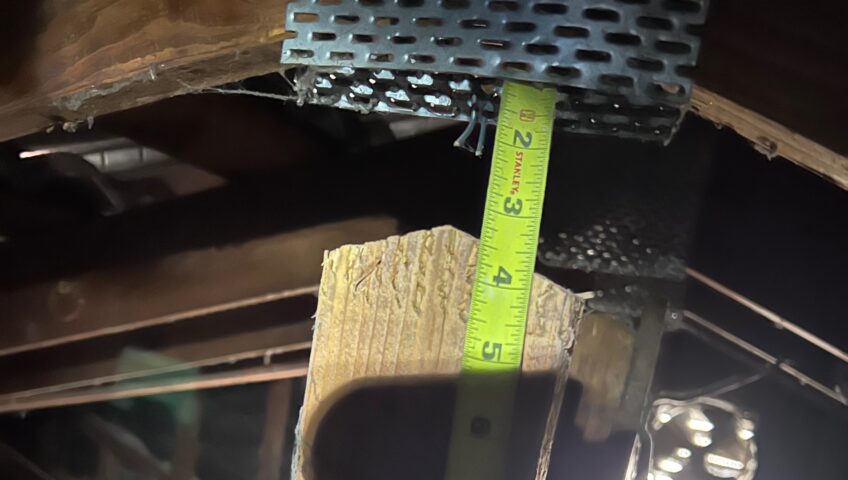
We responded to a call, to take a look at a ceiling that was sagging in a kitchen. The ceiling height dropped down 3” in the middle of a 12’ span. Upon further inspection, we found that the house had trusses for the ceiling/roof framing and usually removal of partition walls below is not problematic. This discovery causes me to change my opinion on this. The picture attached shows that 3” separation of the engineered truss from the roof ridge connection.

Removal of a load bearing walls may create structural problems in a home, including sagging ceilings, unleveled floors, drywall cracks, and sticking doors. Recognizing the warning signs of this is important. Even removing just a portion of a load bearing wall to create a wider door or window opening can be a problem if not done correctly.

Demolition of a load bearing walls without properly supporting the load they were initially designed to carry could result in a structural collapse and even injury.

What is a load bearing wall?

Homes and other structures have two basic types of walls, load bearing and non-load bearing. Just as the name implies, one carries weight above it and the other does not. A load bearing wall is a structural wall that may carry the weight of the roof, upper floors, the ceiling and even weather such as snow. The weight is often referred to as the “load”.

An active load, starting with the roof and everything under the roof gets transferred down to the footings. Engineers will often refer to the “load path”, which is basically the way or route that the weight gets transferred down to the home’s foundation, piers and/or footings.

Generally, the outside walls are all load bearing. Interior walls of a home may or may not be load bearing, depending on how the house was engineered. Older homes that have a hallway or wall down the center may be load bearing. In many newer one-story homes that are built with trusses, there may not be any interior load bearing walls because all of the loads get transferred to the exterior walls by the trusses. In the above picture, that may not be the case. These particular trusses did require a load bearing wall in the middle of the structure, which is how they were designed.

Why walls are removed.

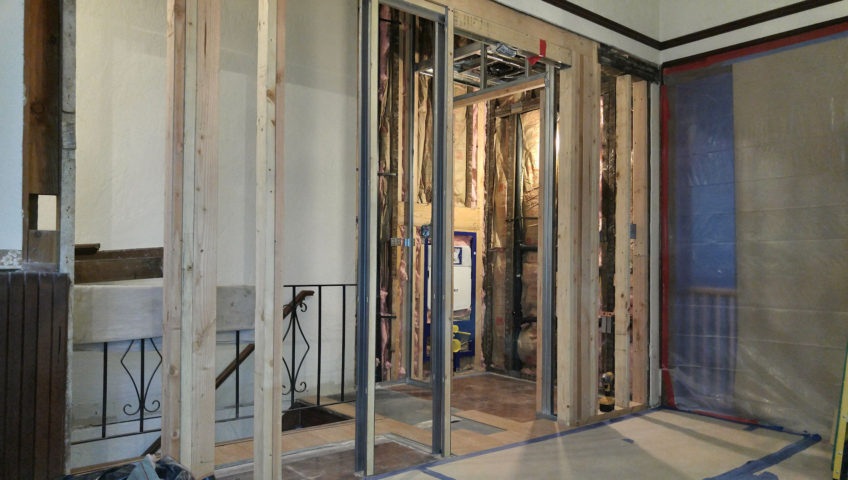
The most likely time that a load bearing wall gets removed is when a home has remodeling work done. Owners of older homes often want to have a more open floor plan, so they remove walls to get a more open look. In the process, they remove a wall and don’t realize that it is a load bearing wall. Professional contractors will normally check first to see if a wall is load bearing before they remove it. If it is, they will usually put a header (wood or steel) in the opening to carry the weight. At times an engineer may have to do calculations on the design and header size.

Warning signs that a load bearing wall has been improperly removed.

Sagging ceilings – If a wall is removed between two rooms or even moved to enlarge a room, then the ceiling may sag. This happens when proper structural support was not installed to carry the weight that the removed wall was holding. Drywall and plaster ceilings are generally connected to wooden ceiling joists spaced at 12, 16 or 24 inches on center or connected to wooden trusses. When a wall is removed that holds up the ends of the ceiling joists or the trusses, then the weight of the ceiling and any load above it may cause the ceiling to sag or drop down. The ceiling may sag a half-inch or more, and in a few instances may collapse.

Ceilings that sag a quarter or even a half of an inch are not always a sign that a load bearing wall has been removed, since over time ceilings may sag naturally. If a ceiling drops a half-inch right after a load bearing wall has been removed, then that is a concern. A ceiling that sags an inch or two becomes more of concern that a load bearing wall has been removed and that the ceiling has not been properly supported. Consulting with a structural engineer can provide valuable information.

Floor sagging or not level – If a two or three-story home has a load bearing wall removed without providing proper structural support, then the second or third story floor may sag in the area above where the load bearing wall under the floor was removed. When you see the floor on the second or third story sagging, then you should go down one story and look at the ceiling area for a corresponding sag or bow.

Doors and windows rubbing or sticking – If a load bearing wall has been removed without proper support installed for the load above it, then the doors, windows and roof above it may be compromised. Doors and windows may rub, stick, or not open because of the framing in the wall that the door or window is in may have shifted. Roof structure may also begin to sag and possibly collapse.

Remember that there are several reasons that doors or windows may stick or rub other than a load bearing wall being removed. These reasons may include the shifting or movement of the foundation, swelling due to humidity and moisture, too many coats of paint, or even poor workmanship and installation.

Cracks in the drywall or plaster – It is common for cracks to appear in the drywall or plaster when a load bearing wall is removed without properly supporting the load that it was carrying. This is basically because the ceiling area may drop or sag, resulting in cracks. Cracks may also occur in some of the wall areas due to the stress generated by the movement of the framing, ceilings, and walls.

Note: Warning signs that a load bearing wall has been removed and no proper support has been installed, may not show up immediately after the work is done. It may take months or even years for the warning signs of problems to show.

Removing a load bearing wall.

When a load bearing wall is removed, or even a portion of it, there should be a plan on how the weight that it is carrying will be supported. The removal of a load bearing wall should be done by a professional who understands how the weight that it is carrying will be temporarily supported while the permanent support modifications are being installed. If the area being removed is small and the load is not excessive there may not need to be support or just minimal support may be needed.

Typically, a beam, either wood or metal, will be installed in the area where the wall was removed to carry the weight. At times a contractor may refer to this beam as a “header”.

At each end of the header or beam, a contractor will usually have a support of some type, often a post. These supports are called load points. The base of this post needs a solid area, footing or base to sit on. At times a concrete pier or footing is required to be installed to facilitate carrying the weight.

Engineers have different ways to support a ceiling where a load bearing wall has been removed

Homeowners and buyers usually have several choices on how to support the load above a load bearing wall once removed. Naturally, some ways are more complex or costly than others. Knowledgeable and appropriately qualified general contractors are good resources to consult with as well as structural engineers.

Need help, fill out contact form on Contact Me page.

This may help you plan and stay on budget during you repair, remodel and renovation project.

Staying on budget during your remodel and renovation project.

Staying on budget during your remodel and renovation project can be difficult and end up being much more expensive than you anticipated. Many renovations uncover issues you weren’t aware of when you started. It can be hard to stick to a budget during the renovation process.

Sticking to a home improvement budget requires an accurate estimation of your project’s cost right from the start. Then add a 10%-20% buffer for those unpleasant surprises that often result in cost overages. This home improvement project estimator shows the median costs for projects in the American Housing Survey.

Here’s a discussion on “Staying on Budget During My Repair, Remodel and Renovation Project”. This may help you plan and stay on budget during you repair, remodel and renovation project.

WHAT DO I NEED TO KEEP IN MIND BEFORE I BEGIN RENOVATION TO HELP ME STAY WITHIN MY BUDGET?

  • Plan ahead before you spend a lot of money! Make sure the design is exactly what you want! Do enough research to know when it’s smart to splurge on materials and appliances and when it’s not.
  • Many general contractors say the biggest mistake they see clients make is changing their minds mid-construction. That can easily ­derail the project. This is because of structural concerns, permit problems, and materials that arrive damaged or broken. These were all cited by contractors as primary reasons for delays. Anticipate these all-too-common issues and help keep your project on track. 

WHAT ARE SOME AREAS TO BE AWARE OF WHEN IT COMES TO RENOVATION COSTS?

  • A general contractor will tell you that unforeseen structural damage is one of the leading reasons a renovation will fall behind schedule. Your contractor can advise you on scheduling a home inspection to determine if you have any structural damage that needs to be repaired ahead of the renovation project itself, or if that damage will change your plans. 
  • Your contractors will get permits on your behalf but will charge you for obtaining permits. You may want to consider doing it yourself so that you aren’t spending $100 per hour for the contractor to wait in line. In some urban areas, obtaining permits is so burdensome that specialists call permit expediters to handle the process for you. Some cities keep lists of approved expediters at the building department. Engaging one gives you an advantage since their sole focus is to keep your project moving along.
  • It is not uncommon for a renovation project to be delayed because materials arrived damaged or the wrong items were shipped. You can avoid this all-too-common issue by shopping with local vendors whenever possible. You may pay a little more to buy materials in your area, but it can save you time and money from the problems that can arise when items come from far away.

Robert Calvo, General Contractor is proud to serve in and around the Carmichael community in repairs and renovations to area homes and businesses. You can read testimonials from our satisfied customers here. We are full-service repair specialists, too, so don’t hesitate to contact us for help. 

bathroom remodel

Bathroom Renovation Mistakes

A bathroom renovation can be an expensive undertaking, so you will want to select the best designs, materials, and professionals possible to make sure your money is put to good use. You may also want to consider which bathroom renovation projects to avoid, and how to avoid costly mistakes. We can help you with that. 

Some bathroom renovation project mistakes to avoid are:

Moving Fixtures

One of the most expensive renovation projects is one that involves new plumbing. If you move the toilet, sink, or shower from its original location, you can just plan on your budget increasing by thousands of dollars. Before you take this particular step, make sure that it is a necessary part of achieving your dream design. 

Changing Plans

Before the project is ever started, make sure it can be achieved by having a detailed plan. If it is going to require walls being demolished, you may be smart to hire a designer to help you here. This plan needs to take the position of doors, windows, plumbing, and wiring into account so that you can avoid getting into the middle of your renovation only to find out that it is not something that can even be achieved. 

Putting Looks First

It’s easy to get carried away with all the beautiful materials and designs available for a bathroom and to completely forget functionality. Your bathroom needs to be easy and comfortable to use, first and foremost. A poor layout can make the most gorgeous bathroom a nightmare of awkward spaces. Always consider safety, accessibility, and comfort first. 

Sub-Par Installation

Businesses that claim to be cut-rate while achieving high-quality results should be avoided. Even the most expensive materials will look cheap and ugly if they are installed in an unprofessional way. You can end up with results that are so unacceptable, it is necessary to re-do the job. Expensive, wasteful, and frustrating, to say the least. It is also imperative to hire licensed professionals for electrical and plumbing work. These projects have to be done according to code, with permits in place. 

Wrong Materials

When selecting your materials, make sure they are durable and water-resistant. Many natural materials are lovely, but when they get damaged by water they don’t look so great anymore. Wood, wallpaper, and stone tile should all be treated so that they are able to repel water, soap, and other bathroom related substances.

Here at Robert Calvo, General Contractor, we have the experience and skill needed to complete your bathroom renovation project in a professional and timely manner. We are a full-service general contractor company, and we’re proud to serve the Greater Sacramento area business and home-owners.

Protecting Yourself and Property from Contractors…

Protecting yourself and your property, please read…

Before I became a licensed contractor while studying for my test, I got a call out of the blue regarding a drywall job. I was advertising as a handyman on Craigslist. So I show up at some house in downtown Sacramento and proceeded to go check out this potential job. The couple that was there, showed me where they wanted to have a wall built up on top of another wall and make this wall go all the way up to the ceiling. While checking it out and taking notes, I noticed that there were some other people there in this empty house walking someone around.

So as we continued to talk, various other requests where coming in such as can you do tile? We want some laminate flooring and so on. So I kept on taking notes as my gut started to get uncomfortable. After they showed me approximately $3000 of work, I asked them if they had an email address and that I would send some prices to them later. I left, went to my truck and crumbled up the notes including the email address and drove away. I was not legally qualified to bid on all that work as a handyman and I am pretty sure that I had been called into what the Contractors State License Board calls (SWIFT) which is short for Statewide Investigative Fraud Team.

I would have been an illegal contractor if I priced out those jobs, while they should have been protecting themselves The CSLB puts on the SWIFT construction stings to catch illegal contractors and in turn, protect you the consumer.

What is illegal contracting? Illegal contracting activity is an unlicensed person performing work on a project valued at $500 or more in combined labor and material costs (Yes, including materials!). This practice is not only illegal, but is also unfair competition for licensed contractors who operate with bonds, insurance and other responsible business practices.

CSLB’s warning on Owner/builder…

Anyone who talks you into being your own general contractor, or “owner/builder,” may be doing you no favor. “Owner/builder” describes a situation in which the homeowner becomes the general contractor.

As an owner/builder, you (not the person you hire) assume responsibility for the overall job. You should be protecting yourself.

Your responsibilities may include such things as state and federal taxes, workers’ compensation insurance, and other legal liabilities. You may be required to hire various subcontractors for your project, scheduling their work and supervising the job. If a worker is injured while working on your property, you could be asked to pay for injuries and rehabilitation through your homeowner’s insurance policy. By signing a building permit application as an owner/builder, you assume full responsibility for all phases of your project and its integrity.

Hiring an unlicensed “consultant” to manage the project does not save you money in the long run. By hiring a licensed experienced contractor for your project to hire licensed knowledgeable tradespersons, the contractor becomes responsible for all phases of construction. Unless you are very experienced in construction, it is best to leave these matters to your licensed contractor.

How you can hire someone while protecting yourself…

-Check the contractor license number at www.cslb.ca.gov to make sure it is current and in good standing.

-Ask to see the contractor’s pocket license and a current photo ID.

-Get at least three contractor bids and references.

-Ask whether your contractor carries general liability insurance and workers’ compensation insurance for employees.

-Make sure all project materials and expectations are spelled out and signed in a written contract, including clean-up, debris removal, and site security.

-Ask your contractor if he or she understands your project expectations.

-Schedule and document each phase of your project and the corresponding payment schedule.

-Do not let payments get ahead of the work. Pay no more than 10% down or $1,000, whichever is less.

-Try researching your contractor’s name online for additional reviews.

bad construction
“Oops”, plumber should have shut door before installing the bathtub…

Why I want to blog…

Why I want to Blog. After several years in the construction industry whether it was as an employee of either a residential or commercial contractor or a remodeling business owner for the past 8 years, I have ran into a lot of situations and experiences that could be shared with others by way of a blog. Yes, I could keep this information to myself and come to your place to take care of potential issues and problems, charge you and go on my merry way.

One of my clients told me that I need to pass on what I know, she was talking about hiring and training someone up with my knowledge. I’m not quite ready for that yet, except maybe physically. I decided that over time to create some useful articles that can help you, help yourself in various ways and maybe save you some time, money and headache. I do field calls and if possible, try to assist potential clients over the phone to solve their issues without a visit and cost. It would be nice to say, “I wrote a blog on that very topic” and point them here to my website.

This will be a as time permits project. I am not sure what topics I will come up with and welcome suggestions. These articles will take some time to create, hopefully they will be useful to you as they get created. So, that is “Why I want to Blog.” Thanks for stopping by…


Remodeling Contractor Blog

Water Intrusion, your home’s worst enemy…

Out of all the elements out there, water is by far one of the worst culprits that can turn your home into a disaster. Water intrusion can show up in many ways such as broken pipes, appliance failure (e.g. water heater, washing machine, ac unit, refrigerator and dishwasher),  failing shower surround systems, leaking sink plumbing and toilets. Water can also enter your home from the outside from cracks or gaps in doors and windows, failing siding and trim, bad ground grading, sprinkler systems, clogged downspouts and old or faulty roofing.

Once the water has made it into your home, it can cause wood to decay. It can also create an environment where mold can grow starting on the inside of walls, floors and ceilings and by the time you notice it, it can already be well on its way in creating damage. Termites also thrive on moist wood and so does fungus.


Things to take a look at…

On the exterior of your home there are things to pay attention to. Gutters should always be cleaned and if not can lead to problems. Fascia boards that your gutters are attached to are usually made of wood. When your gutters are filled with debris, water backup can happen causing your gutters to leak or even overflow which in time can cause your fascia and even the roof overhang to rot pretty quickly. This can escalate to your wood siding causing extensive damage to your home.

Another exterior area to pay attention to is the ground that surrounds your house. Does the ground slope away from the home in all directions? Are gutters and any other drainage pipes also draining away from the house? Does your backyard slope toward your house? Common remedies are downspouts that drain away from the house at least 3 feet, adjusting the soil creating a slope away from your home and having a contractor install a “French Drain” at the base of a hillside to reroute water away from your home.

As far as your foundation, keep in mind that concrete is very porous and will readily absorb moisture while leaching salts and various minerals out of the concrete that are required for the concrete to remain solid and structurally sound. Concrete can become weak and brittle.

Are your sprinklers spraying on the house? Hose bib leaking when you turn on the hose? Bushes touching the house and acting as a sponge in the wet seasons? There is a lot to keep an eye on, but worth paying attention to.

On the interior of your home, always keep an eye on what’s going on under your sinks. For some reason, this area is often overlooked due to our tendency to overload these areas with items making it hard to notice when something is leaking. In bathrooms, toilet wax rings tend to fail over time causing leakage which starts to deteriorate flooring. if it’s a second story bathroom, it will cause damage to the ceiling below, which is usually how it gets noticed. In the bathtub, a typical point of failure is the overflow gasket on the tub itself, kids take a bath and water shows up leaking out of the ceiling below and gets noticed.

Keep an eye on all water lines that go from the wall valves to fixtures and appliances such as washing machines, refrigerator water lines and all faucets. These should be replaced periodically, say every 5 years.

Hopefully this has been informative and helpful and save you some expense and headache in the future.

Robert Calvo, General Contractor


Water Intrusion